Do you struggle with delayed padel court installations? Bad installations cost you money and clients. I will show you the exact steps to build a court perfectly on time.
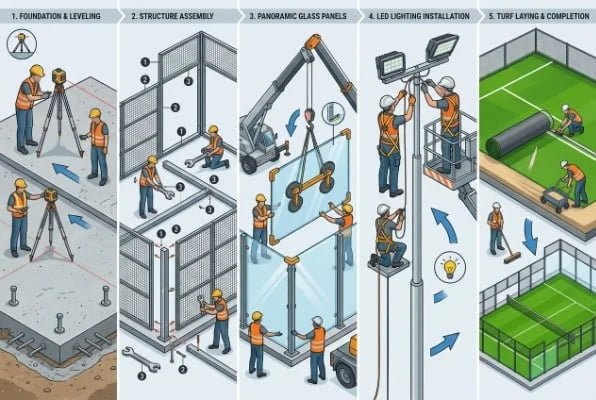
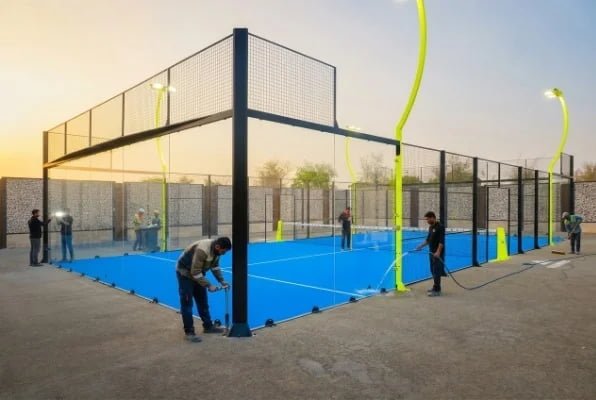
You can install a padel court in five steps. You must prepare a solid concrete foundation first. You set up the metal frame and glass fencing next. You wire the lighting poles. You lay the artificial turf and install the net for a complete court finally.
You want your court to last for years and generate good profits. You cannot afford mistakes during the installation. I share my professional experience with you here. You read this guide so you avoid common traps.
How to Choose the Location and Prepare the Foundation?
Does a bad foundation ruin your entire court? A weak base causes cracking and stops games. We fix this by building a proper concrete base with exact measurements.
You must build a concrete foundation with a thickness of 15 to 20 centimeters. The ground must be completely flat. The horizontal deviation cannot exceed 2 centimeters. You build a good drainage system for outdoor courts to prevent water damage.

The Importance of a Solid Base
I often see clients lose money because they rush the foundation work. You need a stable and firm base. You must consult your landlord early if you already have a concrete floor. You need to know the exact thickness of the old concrete. You use a laser level. You use it to check the slope.
Team and Time Management
Once the concrete becomes completely hard and flat, you can start the real work. You need four construction workers to install the court parts. Your team does not need special experience. You just follow our installation drawings. We make the drawings very clear. An inexperienced team usually needs about five days to finish the first court. A skilled team finishes the job in just three days.
Foundation Checklist
| Requirement | Specification |
|---|---|
| Concrete Thickness | 15 – 20 cm (Minimum 10 cm) |
| Maximum Deviation | 2 cm across the site |
| Drainage System | Required for outdoor courts |
| Labor Needed | 4 workers |
| Install Time | 3 to 5 days |
You must follow these rules. Good preparation saves you a lot of time. Your buyers will trust your quality when the ground is perfect.
How to Install the Metal Frame and Fencing?
Do broken glass panels worry you? Poor frame setup breaks glass and hurts players. We use specific tools and spacing to secure the frame safely.
You build the metal frame first. You align all metal parts before you tighten the screws. You install the mesh fence and the tempered glass next. You must use rubber pads between the glass and metal to absorb ball impacts.
Aligning the Steel Structure
You must start by checking the drawings carefully. You place the frame parts on the ground first. You check the exact positions of the outer fence. You must make sure all metal frames align perfectly. You tighten the bolts only after you check every corner. This action stops crooked walls.
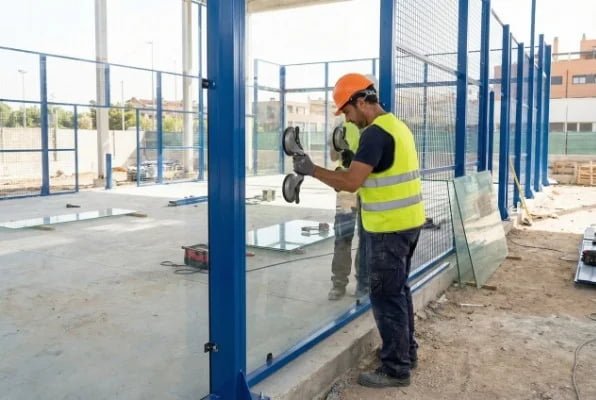
Handling Tempered Glass Safely
I always tell my buyers to be extremely careful with glass. Your workers must use professional vacuum suction cups. They use these cups to lift and move the glass panels. This action stops slips and prevents serious injuries.
Protecting the Glass
You cannot let the glass touch the steel frame directly. The ball hits the glass very hard during a game. You must install rubber gaskets, washers, or neoprene pads between the glass and the steel. These soft parts absorb the shock.
Glass Spacing Rules
| Material | Purpose | Required Gap |
|---|---|---|
| Rubber Gasket | Shock absorption | N/A |
| Tempered Glass | Wall structure | 10 mm gap between panels |
| Steel Frame | Main support | N/A |
You must leave at least a 10 mm gap between the glass panels. The weather changes the size of the glass. Heat makes things expand. This gap stops the glass from breaking in hot weather.
How to Set Up the Lighting Poles and Fixtures?
Are you tired of dark spots on the court? Bad lighting ruins evening games and stops club revenue. We install bright LED lights on tall poles.
You install the light poles to the metal frame once the walls are ready. You attach LED lighting fixtures to the top. A licensed electrician must handle all electrical wiring. You can postpone the wiring step if the electrician is late.
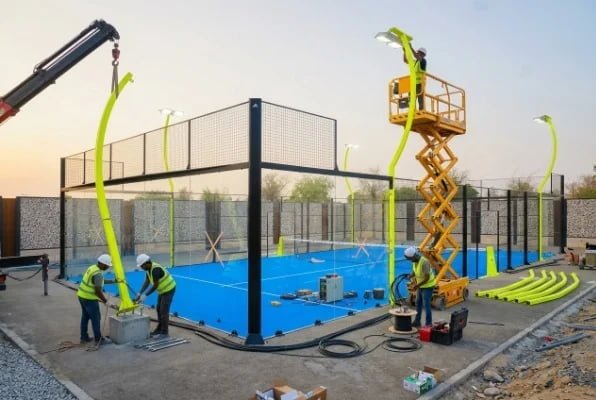
Setting Up the Poles
The main structure of your court is ready now. You can start the lighting setup. You install the tall light poles onto the steel frame. You secure them with strong bolts. You attach the LED lights to the top of the poles. Your players need bright and even light. I helped a club owner fix his lights last year. His old lights had shadows. We put up new LEDs. His nighttime bookings doubled immediately.
Electrical Wiring Safety
You must not guess with electricity. A licensed electrician must do the electrical wiring. You want to keep your players safe. You want to pass all local safety rules.
Managing Delays
Sometimes your electrician cannot arrive on time. You do not worry. This problem does not stop your project. You can skip the wiring for now. You move to the turf installation. You let the electrician do the wiring later.
Lighting Setup Guide
| Task | Who Does It? | Timing |
|---|---|---|
| Mount light poles | Construction team | After frame setup |
| Attach LED fixtures | Construction team | After pole setup |
| Wire electricity | Licensed electrician | Anytime after mounting |
You save time because you do not wait for one person. You keep the project moving forward.
How to Lay the Artificial Turf Surface?
Do loose turf seams cause tripping hazards? Bad turf installation creates an ugly and unsafe court. We lay the turf carefully and fill it with sand.
You use three rolls of artificial turf per court. You cut the extra backing material first. You use a laser level to place the white lines. You connect the joints with PET tape and glue. You fill the turf with fine silica sand and brush it evenly.
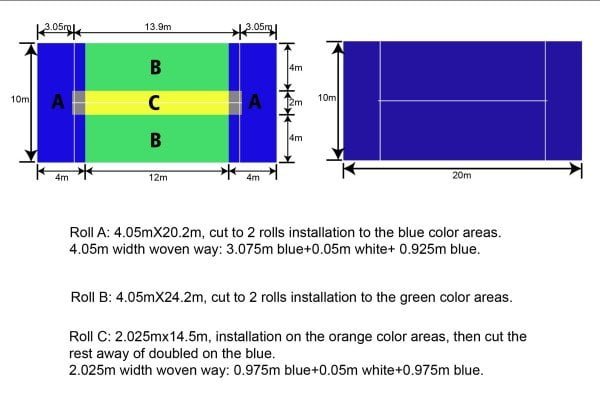
Understanding Turf Rolls
You usually need only three rolls of turf for one site. I will explain the cutting process. You take Roll A. It measures 4.05 meters by 20.2 meters. You cut it into two parts for the blue area. You take Roll B. It measures 4.05 meters by 24.2 meters. You cut it into two parts for the green area. You take Roll C. It measures 2.025 meters by 14.5 meters. You put it in the orange area and cut off the extra blue parts.
Laying and Gluing
You must cut off the extra backing material from the sides. You use a laser level. You find the exact position for the white lines. You lay the turf down without glue first. You open the joints. You put PET connecting tape under the joints. You apply glue and press the turf down.
Sand Filling Rules
You must wait for the glue to dry. You add fine silica sand. You do not use yellow sea sand. Sea sand ruins the grass. You need between 1000 and 1600 kilograms of sand. The amount depends on the turf model. You can ask me about the exact amount. You pour the sand. You use a grass brusher to spread it evenly.
Turf Cutting Table
| Roll | Dimensions | Target Area |
|---|---|---|
| Roll A | 4.05m x 20.2m | Blue area (Cut in 2) |
| Roll B | 4.05m x 24.2m | Green area (Cut in 2) |
| Roll C | 2.025m x 14.5m | Orange area |
How to Install the Net Posts and Net?
A loose net ruins the padel game. Posts that shift over time look cheap and unprofessional. You need a rock-solid net installation to keep players happy.
You install the net posts 10 meters apart in the center of the field width. You fix the posts securely to the ground. The center of the net must measure 0.88 meters high. The sides must measure 0.92 meters high.
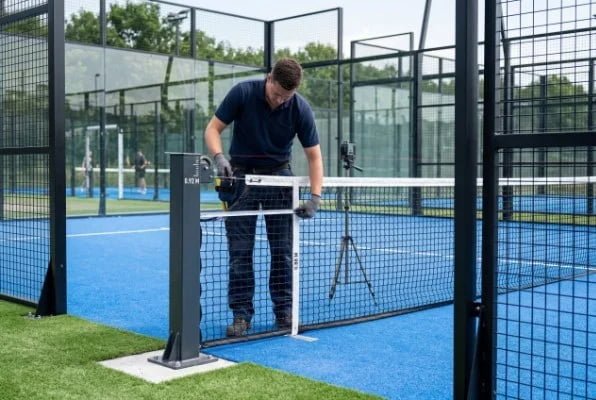
Positioning the Posts
You install the net posts after the turf glue cures completely. You must find the exact center of the court. The total length of the play area is 20 meters. You must place the posts exactly 10 meters from each back wall. The posts must sit precisely in the middle of the court.
Securing the Equipment
You must fix the posts very securely to the concrete ground. The net takes a lot of tension. The posts will bend if they are loose. You must use strong metal cables inside the net. The maximum diameter for the metal cable is 1 cm. You stretch the net across the entire 10-meter width of the field.
Checking the Heights
You must measure the net height carefully. The middle part of the net drops slightly by design. The exact center must sit at 0.88 meters above the ground. The ends of the net near the posts must sit at 0.92 meters above the ground. You must align the goalposts perfectly. Your court is completely built once you finish this step.
Net and Post Measurements
| Measurement Point | Required Value |
|---|---|
| Distance from Back Wall | 10 meters |
| Distance Between Posts | 10 meters |
| Net Height at Center | 0.88 meters |
| Net Height at Posts | 0.92 meters |
| Cable Diameter Limit | 1 cm |
What to Check During Final Testing?
Do you skip the final inspection? Hidden mistakes cause big problems after opening day. We do a strict final check to guarantee top quality.
You must check the steel structure for gaps and tighten all screws. You inspect the glass for cracks. You verify the turf is flat and the seams are tight. You test the LEDs and the drainage. You clean up all construction debris finally.
Structural and Glass Checks
Your court looks finished now. You cannot open it yet. You need a very careful final inspection. I always walk around the entire court twice. You check the steel structure first. You look for any gaps. You make sure your team tightened every single screw. You inspect the tempered glass next. You look very closely for dents or small cracks. Small cracks become big breaks later.
Surface and Function Tests
You check the artificial grass. You verify the turf is completely level. You check the white lines. You inspect every glued seam. The seams must be tight and have no cracks. You look at the sand. The sand must spread evenly across the whole court. You measure the net height one last time. You turn on the LED lights. You check the water drainage.
Final Cleanup Checklist
| Inspection Area | What to Look For |
|---|---|
| Steel Frame | Missing screws, gaps |
| Glass Walls | Dents, scratches, cracks |
| Artificial Turf | Flatness, tight seams, even sand |
| Accessories | Net height, working LEDs |
| Site Condition | Clear of trash and debris |
You clean up all remaining construction materials. You sweep away the trash. Your brand new padel court is now complete and ready for action.
Conclusion
You must follow these steps to build a safe and profitable padel court. A solid base, precise metal alignment, and careful turf installation guarantee success for your sports business.